
by Stephen Terry- KM6ZXQ
Just before Christmas of 2018, my son told me he wanted a drone for Christmas so that he could send a camera into space and take pictures of Earth. After explaining to him that perhaps there are more suitable vehicles to achieve this task and admiring how simple getting a camera to space was in his mind, I wondered myself if we could do it. I mean, how hard could it be? I knew then that it wouldn’t be as simple as it was to him, and after digging into it I realized it would be a much larger challenge than I anticipated. This was my welcoming to amateur radio.
With a little help from Google, I was able to find (mostly) sufficient information on how to launch and recover a high-altitude balloon. Almost every resource pointed me to aviation regulations, and a few that spoke specifically about operations in the United States pointed me to the FCC and amateur radio operation. I found that CVARC was offering Technician classes in January of 2019 so I decided to spend my Saturdays with Bill Willcox (KF6JQO) and Kat Hunley (K6VQN) to prepare myself for the VE Session in February. I successfully earned my Technician license, and in April upgraded to General. I recall reading somewhere that getting an amateur radio license wasn’t a license to operate, but a license to learn. That certainly rings truer now, but I digress…
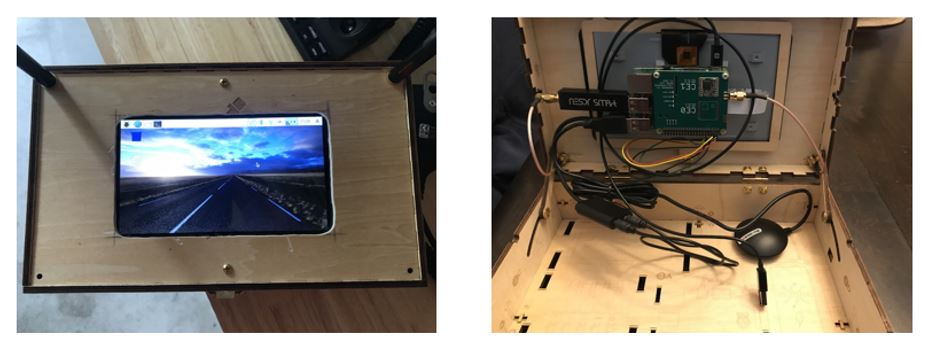
In the months since, my son and I have read, built, and tested a payload transmitter and a mobile receiving station. Our technical solution for getting a camera to near space includes using the Raspberry Pi (a credit card sized computer), a camera, and a collection of other Pi-sized circuit boards to transmit and receive radio signals.
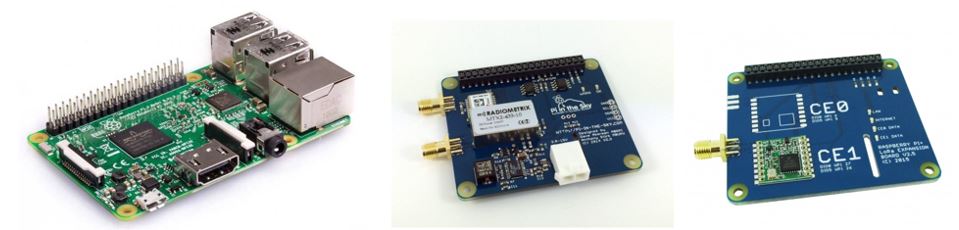
The payload, which is enclosed in a small Styrofoam cooler, includes a Raspberry Pi, a PITS (Pi In The Sky) board with GPS receiver and radio transmitter, a LoRa board for transmitting imagery, a Sense HAT board for collecting environmental and acceleration data, and an 8MP camera.

The receiver, contained within a modified Piper computer kit, includes a Raspberry Pi, a LoRa board for receiving imagery, a nooelec SDR for receiving RTTY, a GPS receiver, and a 7” touchscreen display.
The creator of the PITS board, Dave Akerman, also has software available to create simple trackers for high altitude balloons. To make my life even easier, The Raspberry Pi Foundation has worked with Dave to create Python implementations of his original software called PyTrack and SkyGate.
The PyTrack software, which is run on the payload, allows users to create a tracker that can transmit messages and imagery from the payload. Utilizing this software, I created a tracker that serves two purposes: transmit positional data and the collected imagery. Data such as GPS time and position are transmitted via RTTY and LoRa. The LoRa board also transmits a collected image with SSDV software. The software also allows me to take a full-size image, which I have currently programmed to do every 15 seconds. Outside of the transmitted data, a Sense HAT is used to collect additional data, including temperature, pressure, humidity, along with acceleration on the x-, y-, and z-axes. I created a program to log this data on-board the payload every 5 seconds. With this additional data and the tracker data, we will be able to graphically reconstruct the flight after a (hopefully) successful recovery.
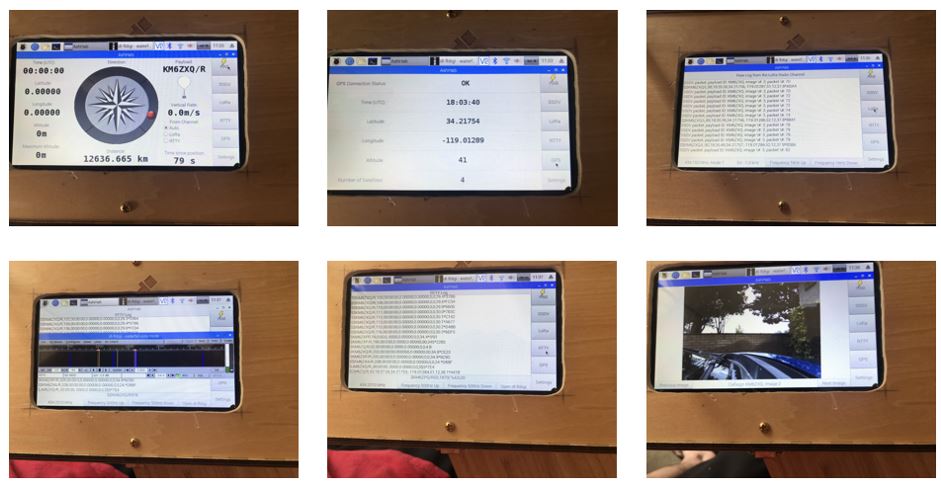
The SkyGate software is a graphical user interface (GUI) that makes it easier to track the payload in real-time. Setting the receive frequencies on the GUI allows us to view the transmitted messages and imagery. This software also uses a GPS so that we can visualize the payload position and the bearing from the receiver to the payload. Unfortunately for me, I purchased a GPS receiver that wasn’t compatible with the software. Fortunately, I was able to modify the software to decode the GPS messages from this receiver. To receive the RTTY transmissions, the GUI requires the use of an SDR and the dl-fldigi software package. This software, created by the U.K. High Altitude Society, is an adapted version of the Fldigi software created by David Freese Jr. (W1HKJ). Understanding this software was quite the challenge on a 7” screen. After purchasing my first real radio, I was able to decode the RTTY transmissions for the first time with a connected PC. Once I figured out what I was looking for on something a little easier to see, I was able to start decoding the messages on the mobile receiver with the use of an external USB soundcard.
With the payload and receiver working as expected, we were able to extend our testing. Disconnecting all antennas from the payload but the GPS, we tested how long the battery would power the system. Using a 10,000 mAh portable charger, the payload will run for over 5 hours (plenty of time for an entire flight). The same battery on the receiver lasts about 3 hours, most likely due to having to power the touchscreen. Given this, I will most likely revert to powering the receiver through an inverter in the car as we chase the payload down. To simulate how the payload will perform in at-altitude temperatures, I sandwiched the payload between two blocks of dry ice in a cooler. I was able to simulate a minus 30-degree F environment for a little over 4 hours. This isn’t quite as cold as temperatures at-altitude will get, but it was for a much longer duration of time. Internally, the payload temp held fairly stable around 0-degrees F.
Now with our testing complete and a couple of selected launch sites to choose from, we hope to send our camera to near space in mid-July. For now, we’ll continue to dry-run our launch checklist and, as we get close to a launch day, begin to monitor the winds to select the best day and location. Our goal is to reach 100,000 ft. and, if my math is correct, we should be able to achieve an altitude of approximately 107,000 ft. Afterwards, I hope that we’ll be able to report that we successfully launched and recovered our balloon and that we’ll have some pretty awesome pictures to share. For full disclosure, you can purchase kits to accomplish the same task with a lot less work for around the same price. But where is the fun in that? And now, I’ve got some nice toys that I can use for other projects later.